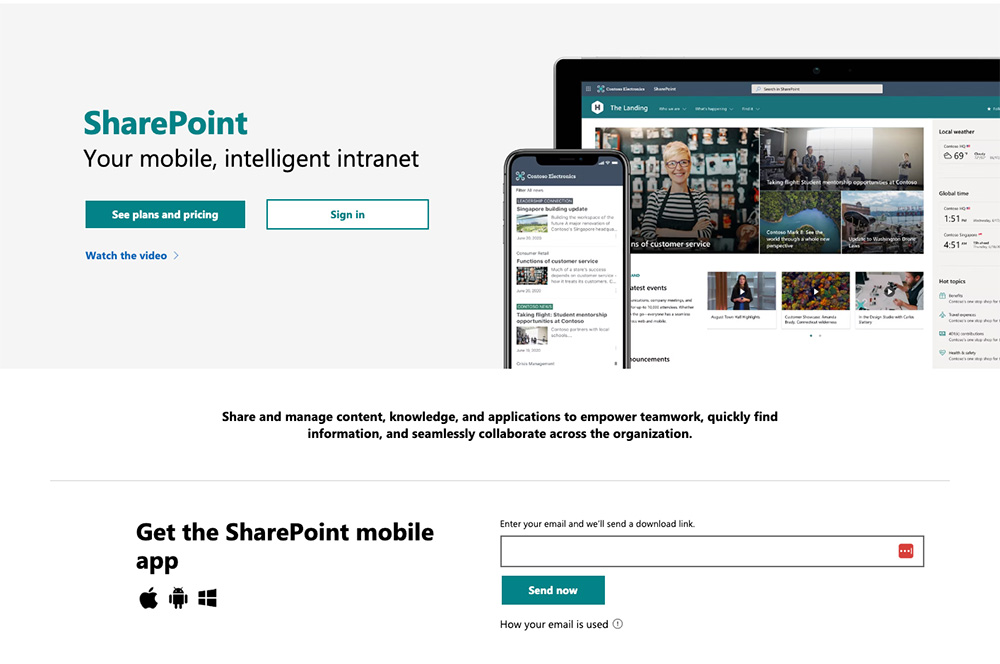
Microsoft SharePoint is a web-based collaborative platform that integrates with Microsoft Office.
It is primarily used for document management and storage, but it also provides features such as intranet portals, social networking, and business intelligence.
SharePoint in Microsoft 365 empowers teamwork with dynamic and productive team sites for every project team, department, and division, Share files, data, news, and resources.
Collaborate effortlessly and securely with team members inside and outside your organization, across PCs, Macs, and mobile devices.
Benefits of SharePoint
Improved data management:
SharePoint allows you to store, organize, share and access critical business information from any device.
You can also use features such as file versioning, document check-in/check-out, indexing and searching to manage your documents more efficiently
Integration with Office 365 tools:
SharePoint integrates with Microsoft products such as Outlook, MSTeams, and OneDrive.
This means you can access your SharePoint files from your email, chat with your team members, and sync your files across devices.
Customization and branding:
You can quickly and easily customize the look of your SharePoint site to reflect your professional style and brand.
And also you can choose one of the default SharePoint themes or a company theme with approved branding.
You can also adjust the site header, footer, logo and background.
Collaboration and communication:
SharePoint enables you to create team sites for every project, department and division, and also share files, data, news and resources with your team members.
You can also use SharePoint pages to create engaging web content with rich media and web parts.
You can also use SharePoint news to keep everyone informed about the latest updates and announcements
Microsoft Excel is a powerful tool that can help you perform various types of data analysis, such as descriptive statistics, data visualization, data cleaning, data transformation, and data modeling. In this short blog post, we will show you some basic steps and tips on how to use Excel for data analysis.
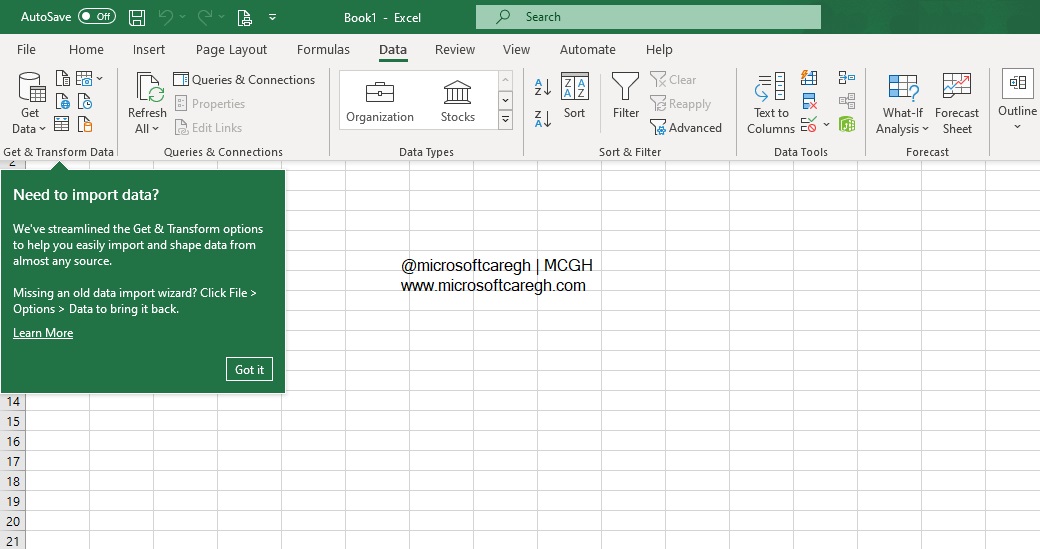
Step 1: Import your data into Excel
The first step is to import your data into Excel. You can do this by opening Excel and clicking on the File tab, then selecting Open. Browse to the location of your data file and click on it. Excel will try to detect the format of your data and display a preview of it. You can adjust some settings, such as the delimiter, the header row, and the data type of each column, before clicking on Load.
Alternatively, you can also import your data from other sources, such as a web page, a text file, a database, or another workbook. To do this, click on the Data tab, then select Get Data. Choose the source of your data and follow the instructions on the screen.
Step 2: Explore your data in Excel
The next step is to explore your data in Excel. You can do this by using various features and tools that Excel provides, such as:
The Quick Analysis tool: This tool allows you to quickly apply some common analysis tasks to your selected data range, such as formatting, charts, tables, sparklines, and formulas. To use this tool, select your data range and click on the Quick Analysis icon that appears at the bottom right corner of your selection. Then choose the category and option that you want to apply.
The Filter and Sort options: These options allow you to filter and sort your data based on certain criteria or values. To use these options, select your data range and click on the Filter icon or the Sort icon on the Home tab. Then choose the column and condition that you want to filter or sort by.
The PivotTable and PivotChart tools: These tools allow you to summarize and visualize your data in a dynamic and interactive way. To use these tools, select your data range and click on the PivotTable or PivotChart icon on the Insert tab. Then drag and drop the fields that you want to analyze into the appropriate areas of the PivotTable or PivotChart.
Step 3: Analyze your data in Excel
The final step is to analyze your data in Excel. You can do this by using various functions and formulas that Excel provides, such as:
The Statistical functions: These functions allow you to perform various statistical calculations on your data, such as mean, median, mode, standard deviation, correlation, regression, and hypothesis testing. To use these functions, enter them in a cell with the appropriate arguments and press Enter.
The Data Analysis ToolPak: This is an add-in that allows you to perform more advanced data analysis techniques on your data, such as ANOVA, t-test, chi-square test, Fourier analysis, histogram, and random number generation. To use this add-in, you need to enable it first by clicking on the File tab, then selecting Options. Click on Add-Ins on the left pane, then select Excel Add-Ins from the Manage drop-down list at the bottom. Click on Go and check the box next to Analysis ToolPak. Click on OK and restart Excel.
Once you have enabled the add-in, you can access it by clicking on the Data tab, then selecting Data Analysis. Choose the analysis technique that you want to perform and fill in the required parameters.
In this blog post, we have shown you some basic steps and tips on how to use Microsoft Excel for data analysis. We hope that this post has helped you learn more about Excel’s capabilities and features for data analysis. If you have any questions or feedback, please feel free to leave a comment below.
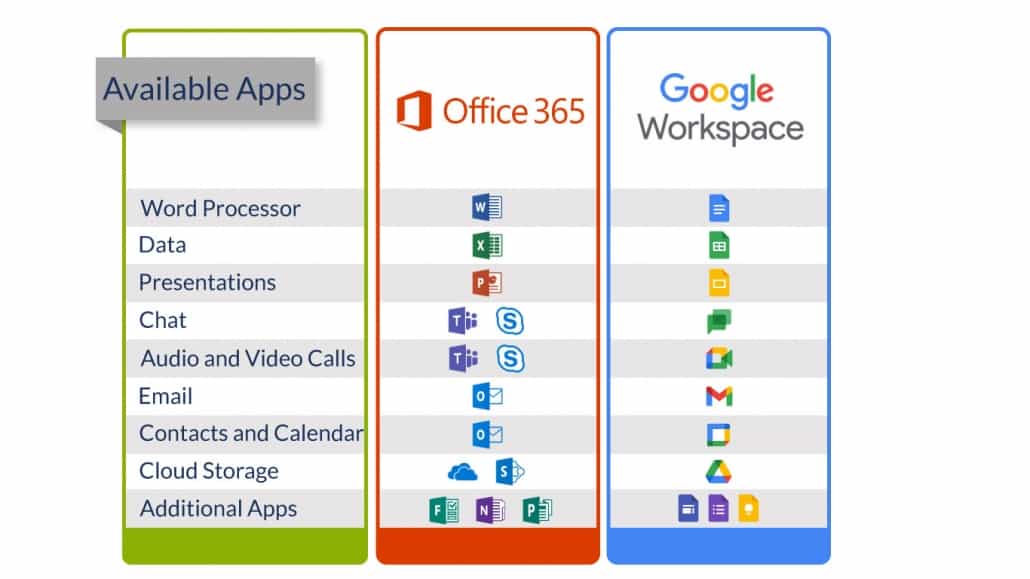
Microsoft 365 and Google Workspace are two popular cloud-based solutions that offer productivity apps, email, file storage, communication, and collaboration tools for businesses of all sizes. But how do they compare in terms of features, pricing, and security? Here is a brief overview of some of the main differences between them.
Before delving into the comparison, are you thinking about switching from one platform to another? If so, you might be particularly interested in the process of migrating from Google Workplace to Microsoft 365. If you’re pondering over making this transition, you’ll find many helpful guides and tutorials online to assist you.
Differences between Microsoft 365 and Google Workspace
File/Cloud Storage
One of the most noticeable differences between Microsoft 365 and Google Workspace is the amount of storage they provide per user. Microsoft 365’s Business Basic plan offers 1 TB of file storage per user, while Google Workspace’s Business Starter plan only offers 30 GB of combined file and email storage per user. However, Google Workspace’s higher-tier plans offer more storage than Microsoft 365’s equivalent plans: 2 TB or 5 TB per user for Business Standard or Business Plus plans respectively, compared to 1 TB per user for Business Standard or Business Premium plans.
It’s essential to note how each platform manages its storage differs too. Take Microsoft 365; it teams up with OneDrive to offer cloud storage and ensure your files are synchronized across different devices for effortless access and sharing. Microsoft 365 has robust file versioning and backup capabilities so that your data is never lost.
On the other hand, Google Workspace leverages Google Drive, celebrated for its intuitive interface and smooth tie-in with the rest of Google’s app ecosystem. Google Drive supports real-time collaboration, meaning multiple team members can work on the same document simultaneously. This flexibility could benefit teams working together closely, regardless of geographical location. Nonetheless, the two can be put together to benefit your company’s productivity.
Email
Both Microsoft 365 and Google Workspace use their own email clients: Outlook for Microsoft 365 and Gmail for Google Workspace. Outlook has more advanced features such as scheduling assistant, shared calendars, task management, and offline access. Gmail has a simpler interface and integrates well with other Google apps such as Calendar, Meet, and Chat. Both email clients offer spam filtering, encryption, archiving, and data loss prevention.
In addition to the mentioned features, Outlook and Gmail have unique advantages.
Outlook’s integration with Microsoft tools like Teams and OneDrive facilitates collaboration and scheduling, which is ideal for a corporate environment. Gmail, meanwhile, excels in search and sorting features, thanks to Google’s search technology. It offers features like ‘nudges’ for email follow-ups, intelligent replies, and a ‘priority inbox’ that helps manage emails by learning user habits.
Ultimately, the choice between the two platforms hinges on individual preferences and business needs.
Productivity Apps
Microsoft 365 and Google Workspace both offer a suite of productivity apps that include word processing, spreadsheet, presentation, note-taking, and form creation tools. The Microsoft 365 apps are Word, Excel, PowerPoint, OneNote, and Forms; Google Workspace’s apps are Docs, Sheets, Slides, Keep, and Forms. Microsoft 365’s apps have more functionality and formatting options than Google Workspace’s apps, but they also require more bandwidth and processing power to run smoothly. Google Workspace’s apps are cloud-native and can run on any device with a web browser. Both suites allow real-time collaboration, version history, and offline access.
Communication and Collaboration
Microsoft 365 and Google Workspace both offer communication and collaboration tools that include video conferencing, instant messaging, team chat, and project management. Microsoft 365’s tools are Teams, Skype, Yammer, and Planner; Google Workspace’s tools are Meet, Chat, Groups, and Currents. Teams has more features than Meet such as breakout rooms, polls, whiteboard, and live captions, but Meet has a simpler interface and can accommodate up to 250 participants per call compared to Teams’ limit of 100 participants. Chat and Yammer are similar in functionality to team chat platforms that integrate with other apps; Groups and Currents are similar in functionality to social networking platforms that allow users to create communities and share content.
Security
Both Microsoft 365 and Google Workspace have strong security measures in place to protect their users’ data from unauthorized access or loss. They both use encryption at rest and in transit; they both offer multi-factor authentication; they both comply with various industry standards such as GDPR; HIPAA; ISO; etc.. However; there are some differences in how they handle security updates; backups; recovery; etc. For example; Microsoft 365 allows users to control when they receive security updates; while Google Workspace applies them automatically without user intervention. Microsoft 365 also provides more granular backup options such as item-level restore; while Google Workspace relies on its version history feature for restoring files.
Conclusion
Microsoft 365 and Google Workspace are both powerful cloud-based solutions that can help businesses improve their productivity; efficiency; and collaboration. However; they have different strengths and weaknesses depending on the needs and preferences of each business. Therefore; it is important to compare them carefully before choosing one over the other.
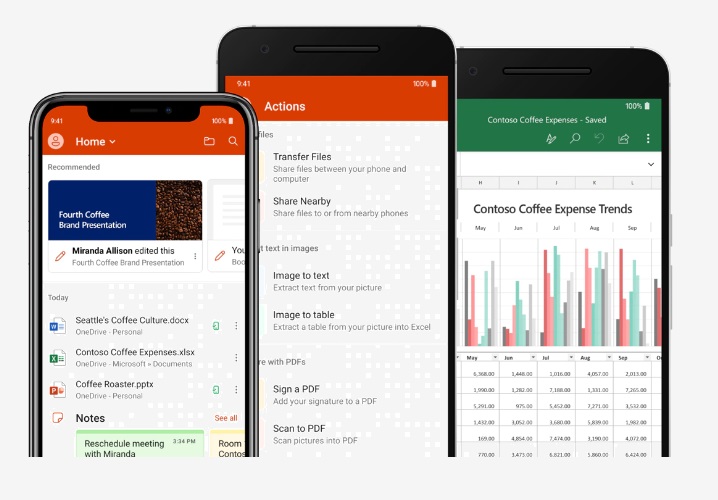
The Microsoft Office app is a mobile app that lets you view, create, and edit documents, spreadsheets, presentations, and more with Office apps designed for mobile devices and tablets. It serves as a hub to access Microsoft 365 apps in one place including Microsoft Teams, Word, Excel, PowerPoint, Outlook, OneDrive, and OneNote. The app works seamlessly with office 365 to connect you to your documents and content.
The app helps you to be productive by allowing you to work from anywhere, anytime, with anyone using Office apps for Android and iOS. You can use the Office app for free and download it from Google Play or App Store and access Word, Excel, PowerPoint, and other features without a subscription. However, some advanced features may require a Microsoft 365 subscription.
You can scan and save documents with OneDrive document scanning using your phone. Letting you skip the bulky scanner and turn your paper documents, receipts, and whiteboards into PDFs. Another feature that helps you to be productive on the go is co-authoring. You can collaborate with others on Word and PowerPoint documents stored in OneDrive or SharePoint. You can see who else is working on the document and their changes as they happen. We share more on scanning to pdf and co-authoring below.
Here are five things that you might not know about the Microsoft Office mobile app
You can scan a document or a whiteboard in Outlook by tapping on the camera icon while composing a mail. The app will automatically trim and enhance the image for you.
You can use voice commands to create emails or dictate text in Word or PowerPoint. Just tap on the microphone icon on your keyboard and start speaking.
You can use Lens mode to capture text from images or documents. The app will convert it into editable text that you can copy or paste into other apps.
You can use Quick Notes to jot down ideas or reminders without opening a new document. Just tap on the note icon at the bottom of your screen and start writing.
You can use Smart Lookup to get definitions, synonyms, or related information for any word or phrase. Just select it and tap on Smart Lookup from the menu.
To scan a document with your camera using the Microsoft Office app, follow these steps:
Lay out your paper on a flat surface
Open the Microsoft Office app
Tap Scan to PDF
Adjust corner points if needed
Tap Confirm
Save as PDF
You can also scan multiple pages into one PDF file by tapping Add Page after each scan.
Co-authoring on the go
Co-authoring features allow you to work together with others on Word and PowerPoint files stored online. To co-author with others, you need:
A shared storage area such as OneDrive or SharePoint
Apps that support co-authoring such as Word or PowerPoint for office mobile
When you open a file that someone else is editing you will see their name at the top of your screen. You will also see their cursor position and changes as they happen. You can also chat with them using Skype for Business by tapping on their name. To invite others to co-author with you just share your file link via email or other apps.
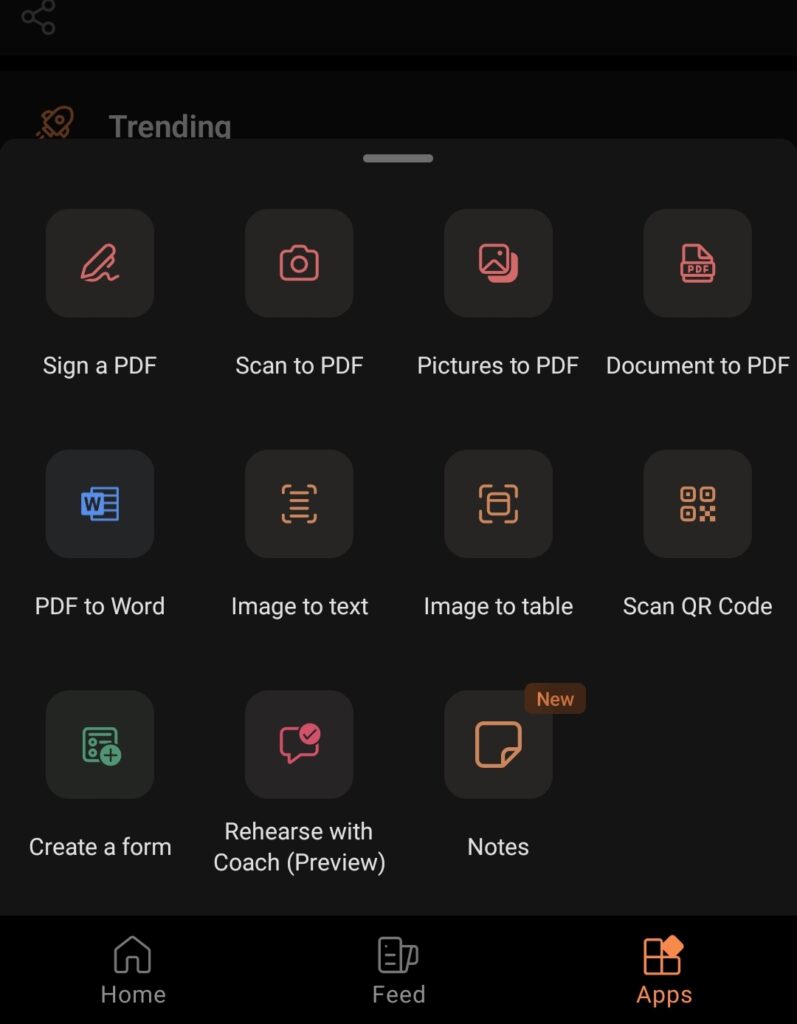
Other exciting features
Action pane: A quick way to access common tasks such as signing PDFs converting images into text creating QR codes etc.
Lens mode: A powerful tool that lets you capture text from images documents whiteboards etc.
Quick Notes: A simple way to jot down ideas and reminders without opening a new document
Voice commands: A convenient way to create emails dictate text etc.
Smart Lookup: A handy way to get definitions synonyms related information etc.
If you want to learn more about these features please visit this link.
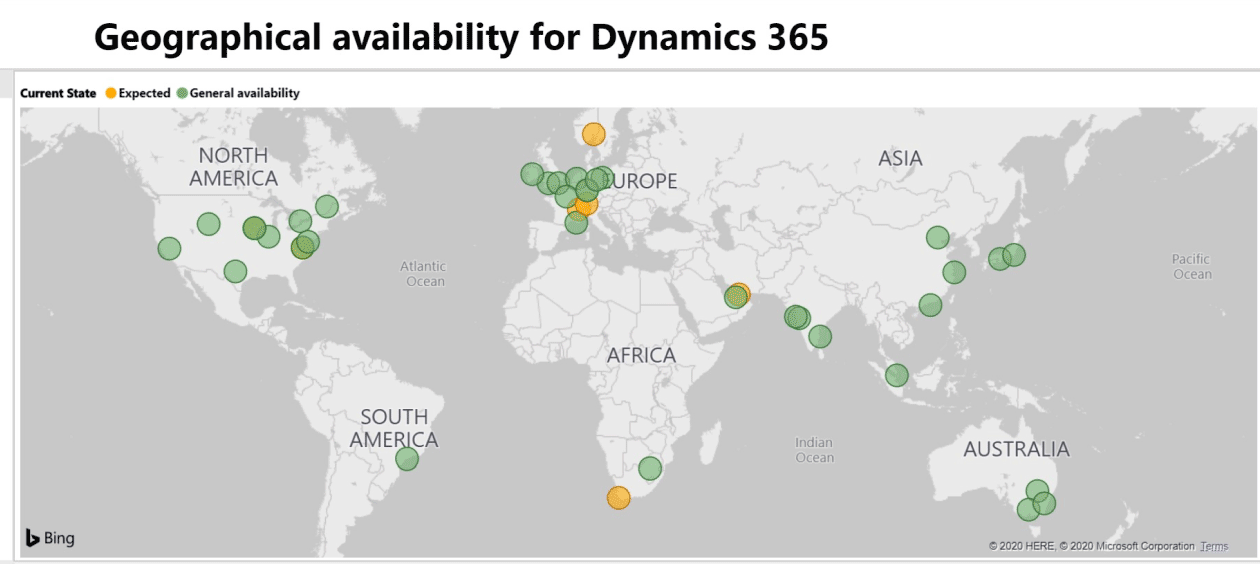
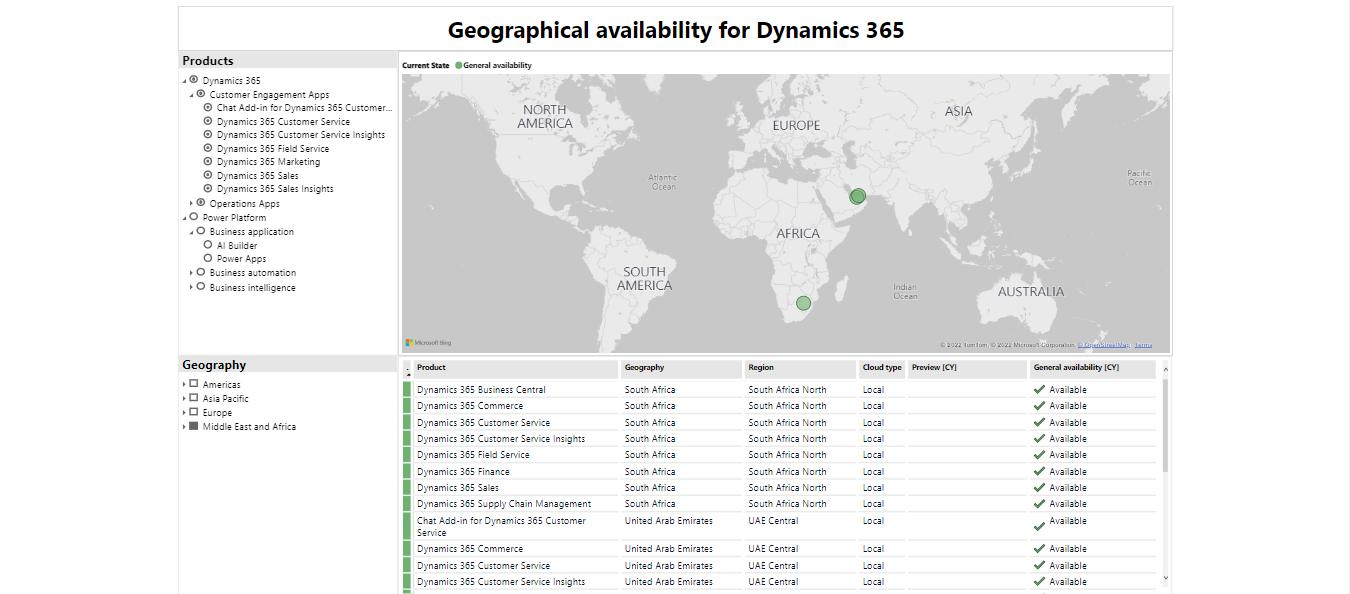
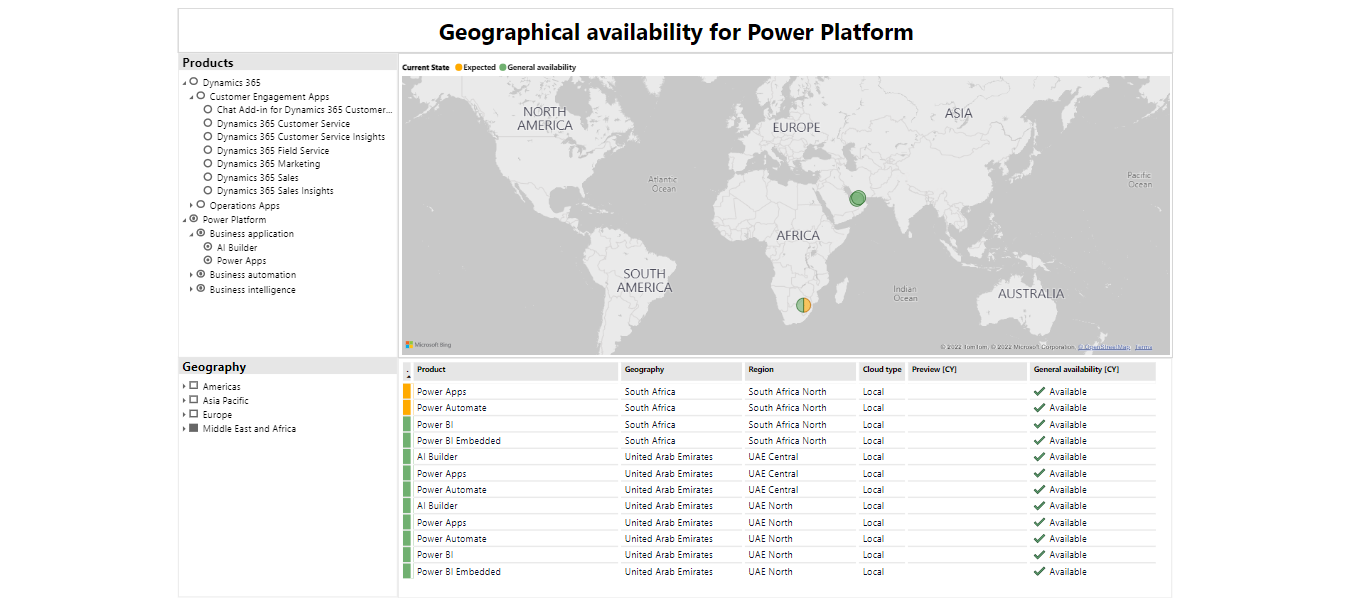
Dynamics 365 and Power Platform services are now generally available in the Mircosoft Africa datacentres. The Microsoft Business Applications will provide organizations with solutions to cut costs, improve efficiencies, drive business continuity and disaster recovery. The services are available in the Microsoft South Africa North and West datacentre regions located in Johannesburg and Cape Town respectively.
Dynamics 365 and Power Platform services feature the ability to rapidly store, analyze, and act on data with intelligent software. While maintaining data residency and sovereignty and meeting compliance and regulatory requirements.
Microsoft notes the continued upgrade of services shows its commitment to investing in Africa. As well as increasing cloud capacity and capabilities to enable organizations in the public and private sectors in the region to accelerate growth through innovation, agility, and resilience.
“Leaders in organizations across industries and sectors are focused on finding ways to improve the flow of innovation and knowledge across the business in order to respond to market changes, customer needs, and specific business and industry challenges at speed. They need digital solutions that break existing silos between data sources, people, processes, and insights,” says Karin Jones, Director of Business Applications GTM at Microsoft South Africa.
“This will accelerate digital innovation in the country by enabling businesses to become more agile, resilient, and competitive,” says Jones.
With this Microsoft now offers Azure, Microsoft 365, Dynamics 365, and Power Platform online services to organizations in the region.
[jetpack_subscription_form show_subscribers_total=”false” button_on_newline=”false” submit_button_text=”Subscribe to get updates right in your inbox” custom_font_size=”16px” custom_border_radius=”0″ custom_border_weight=”1″ custom_padding=”15″ custom_spacing=”10″ submit_button_classes=”” email_field_classes=”” show_only_email_and_button=”true” success_message=”Success! An email was just sent to confirm your subscription. Please find the email now and click 'Confirm Follow' to start subscribing.”]
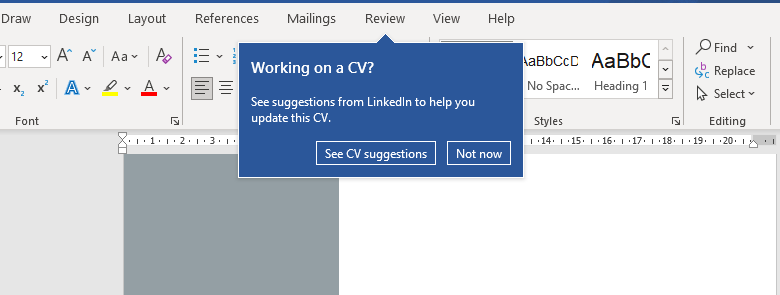
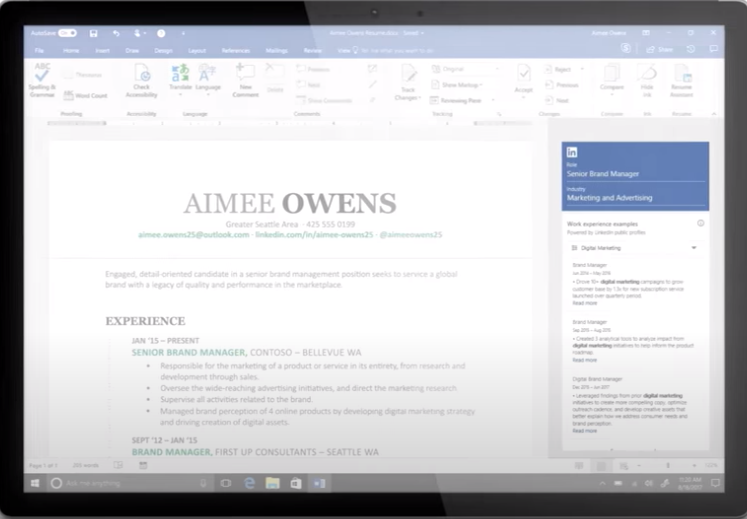
Microsoft is phasing out the resume assistant tool in Microsoft Word which gives people ideas for work experiences and skills. The company started by removing the CV assistant feature from the Semi-Annual Enterprise Channel (Preview) in September 2022. With plans to fully remove the feature from Word for Microsoft 365 and no longer support it by January 2023.
By January 2023, Microsoft will remove the resume assistant feature across Windows (Current Channel, Monthly Enterprise Channel, Semi-Annual Enterprise Channel), Mac, and Word for the web. Microsoft recommends using a resume template in Word or the LinkedIn Resume Builder as a replacement.
The resume assistant tool is a feature powered by LinkedIn in Word for Microsoft 365 that helps resume/CV writers craft compelling resumes with personalized insights. They get real-world examples of work experiences and top skills related to a role or industry. It shows a CV writer examples of descriptions to use as inspiration to tailor theirs so recruiters and hiring managers can notice them.
[jetpack_subscription_form show_subscribers_total=”false” button_on_newline=”false” submit_button_text=”Subscribe to get updates right in your inbox” custom_font_size=”16px” custom_border_radius=”0″ custom_border_weight=”1″ custom_padding=”15″ custom_spacing=”10″ submit_button_classes=”” email_field_classes=”” show_only_email_and_button=”true” success_message=”Success! An email was just sent to confirm your subscription. Please find the email now and click 'Confirm Follow' to start subscribing.”]